Wednesday, December 30, 2015

A Gift for Mom

 When Kiara and I went to see "The Good Dinosaur"  a few weeks ago, I asked her what she was giving mommy for Christmas.  She said her mom had told her you can't wrap a card or a drawing.  I disagreed.  So when we got home, I told her to draw the picture she wanted to give mommy and we'd figure it out.  I had originally though of putting it in a nice frame. Then I remembered the sharpie marker transfer technique!

Our time was limited, so I told her not to color the picture until I could make copies of it.  Then she colored one of the copies. 


After she went home, I transferred two versions of it to fabric- one using the colors sh had colored with, and one black and white that she could color if she wanted. She liked the colored outline one.


I dug out some Christmas fabrics for her to choose for a frame on the picture. She chose a fun lime green tree print.  (I did not encourage her choice, but I did agree with it.  :-)


Here she is at the machine, sewing the borders on all by herself.  She can't reach the pedals, so she uses the buttons and we set the speed to just above turtle.  She sews good and straight for her age.


I helped with the layering and turning it right side out- we did the pillowcase finish.  She did the straight line quilting around the frame herself, too!  
 I'm teaching her right from the start to make sure she signs her work!

And here it is all finished and ready to wrap and put under the tree! (see her signature at the bottom?)
 It says Merry Christmas on the back. 
 Mommy just loved it- and was looking for a special place to hang it!


My last minute sewing included a beanbag frog for Jonathan.

And I made a stocking to hang at our house for him.  However, his mom decided she liked the knitted one better.  (than the frog one I finished a week or two ago)


I think Jonathan likes it too. 


I'm enjoying being a Grandma/ Oma!

I am grateful for:
Family!
Kiara likes to sew
A relaxed holiday
The new Star Wars movie is really really good.
I've had a little more sewing time, so I might get my challenge entry (-ies) done in time!


Thursday, December 17, 2015

29 days until it's due and I haven't even decided what I'm making!

If you are a fellow member of the Museum Quilt Guild, you may know exactly what the title of this post is about.  Our annual challenge is due at the January 16 meeting.  They are always due in January.  Every year since I joined in 1999.  (And, like the Holidays, it still sneaks up on many of us every year!!!)
I have done at least one every year since 2001.   This year, I'm not so sure.   I usually start around August. But, I have done SO little sewing, and am SO far behind, that I'm not sure the Christmas gifts will be finished on time, either!
And it's not that I don't like the theme- Architecture- or have any ideas, because I do!   In fact, I have too many!
After a class with Jane Sassaman some years ago, I started looking at art and architecture books for inspiration.  (Jane calls it a visual bibliography).  One of the first things I realized, is that I love Islamic architecture.  Specifically, I like the gloriously embellished buildings like this.
So that was my first thought- to find something somewhat quilty to use.  Lo, and behold, the Tentmakers of Cairo book was available at the AQS show in Lancaster last spring, not long after the theme was announced!  Some of the patterns in there would fit the theme!  I just need time to find the right fabrics.

Then I remembered the fabulous building I used as inspirations for Guy's quilt, which I thought was pictured on the blog somewhere, but it's older than I realized!!


And here is a picture of the Guardian Building in Detroit.
I only used the colors for that one, but always meant to go back and try to replicate some of the patterns in the tile work.  Maybe now would be the time?

Then I saw this one in a book I borrowed from the college library.
Isn't that awesome???  It's the Hoechst AG Technical Administrative Building in Frankfurt-Höchst, Germany, designed by Peter Behrens. It was a dyeworks and they wanted the bricks to look like the dyes.  How on earth to do this in fabric?  And time is running very short!!!

When I figure out what I can accomplish in the time I have, I'll let you know!  Lisa Boyer once wrote a column about coming out of the studio after sewing for a deadline- where there is moldy food, a refrigerator she can't bear to investigate, and a family who barely recognizes her.  (It is called "The Quilt Aftermath, in her book "Stash Envy".)  I see the events she describes in my future...

I was wrapping presents yesterday and noticed that I have finally started to use up the lifetime supply of wrapping paper I amassed when the boys were little. (You have to have new paper for Santa every year, you know)  Most wrapping paper is not recyclable.  So I will have to look for alternatives to wrapping paper when I finally run out. Personally, since I stink at wrapping, I like gift bags, which can be folded up and reused again and again.  Maybe I'll even make a few quilted ones to use for family, since I know they'll let me have them back.  

I am grateful for:
Kiara wanted to sew to make something for mommy.
There was only one deer who needed to cross the road in front of me!
I goofed, not them, so there's a bonus coming!
The guild ladies liked my dorky trees.
Al pays attention when I tell him about things I am dreaming of.  

Friday, December 11, 2015

The fish is finished!!!

First, I'm going to comment on the weather.  This morning, the view was out the classroom window was pretty spectacular.  The ground isn't frozen yet, which probably has something to do with the mist?? (Earth Science was a loooooong time ago!) 

  Yesterday I had to wait a few minutes outside the shelter.  I didn't even have a jacket on, just a light shirt.  It was gorgeous.  I wanted to be home, pulling weeds.
 A few days ago, we had a pretty heavy frost.  I love how it melts only where the sun hits it!

Ok, so here it is at last- the fish quilt.   I call it Jewel of the Reef. 
If you recall, the background was based on a picture similar to this. I imagine a diver minding his own business, when this elegant lady swims by in a hurry to catch up with the rest of the school.

 Her eye is a piece of jewelry that came from my mother-in-law's collection.  I never wear them, but I keep them around for just this kind of purpose.
 Her tail is two layers of organza with a layer of sparkle netting in between, using misty fuse to hold it in place.  I couched a wonderful (Wonderfil!) thread along the edge, and to define the lobes. The edges of the pectoral fins are serged to make them ruffly.  You can't see how sparkly she is in this picture.

I spent quite a bit of time in the sewing room last week, and managed to get one gift finished!
Cait calls Jonathan "Froggy", so I made him a froggy stocking for his first Christmas.


There was an article in today's paper about the possible effects on local climate of more carbon in the atmosphere and warmer temperatures.  One scary one was that poison ivy loves CO2.  I don't know about you, but I feel there is enough of that stuff around here as it is!!  I don't mean to make light, but it points out the many small things we can't possibly think about, that could be a result of the people (not mentioning names, Ted Cruz) who want to deny there IS climate change- and do nothing to stop it- because it might cut into the billion dollar profits of their donors!!!

I am grateful for:
A day with Jonathan last weekend.
Time to sew
Not having to shovel snow
Laughing until it hurts rather than spend all my time bitching about it
Christmas cookies. (Moo!)

Thursday, December 3, 2015

Bead Embroidery

Original image on paper              Transferred image
One of the images I transferred using sharpies and alcohol didn't come out very well.  When I lifted it to see if it had come out, there was a spot needing more work.  I didn't realize it shifted when I put it back down, so I got a sort of double exposure.
I figured it would be an opportunity to do some embellishing and cover that up with stitching or something.  But after reading this article in Quilter's Newsletter, showing how to do bead embroidery, I decided it was the perfect way to cover up the bad spots.  Plus I get to try out a new technique!


This is as far as I have gotten with it so far.  It takes a long time to do each of those large petals!  I don't know what I'll do with it when it's done.  I thought of transferring more images to a single larger piece of fabric to make it look like the belle of a patch of flowers.  But there's this architecture challenge due at Guild in January, and I have seen sunflower designs used in that way.  Here's a few I liked.

Of course, the problem is figuring out a way to make them into a quilt. Meanwhile- I love the patterning in the last picture- Islamic architecture most likely.

The climate talks in Paris seem to have a sense of urgency at last.  I am hoping with all my heart that they will finally tell big oil to shut the **** up!!

I am grateful for:
Surviving a pretty serious scare
Laughing with a co-worker via email so the boss never suspects
Holiday music on spotify- they have everything!
A little extra playtime with Jonathan last week
He's blowing raspberries at last!


Friday, November 20, 2015

Playing with Markers and Alcohol (It's not what you're thinking)

I'm doing a demo at guild this month on how you can design fabric using Sharpie markers.  Other permanent markers may work, but all of the tutorials I have seen say Sharpies.  It works like this:
The Sharpie markers contain permanent ink, which will not wash away with water. Permanent ink is hydrophobic, meaning it is not soluble in water. However, the molecules of ink are soluble in another solvent called rubbing alcohol. This solvent carries the different colors of ink with it as it spreads in a circular pattern from the center of the shirt. (according to stevespanglerscience.com)


So the first thing I tried, years ago, was tie dying. There are a few sites that show different ways to do this, and I don't remember the exact one I used.  They're all similar, but I love the monster t-shirt at the bottom of this one!
I colored this one first

above piece wrapped on a dowel with alcohol applied

Wrapped on the dowel first, then colored, with alcohol applied
The one I colored first

The one colored after wrapping


More recently, Quilter's Newsletter had an article on doing image transfer. Please note: This link does NOT have the instructions, but is a link to the issue.
We did this activity at the ArtCGirlz meeting in March. 
I've been having fun with that one, finding ways to use it. Here's how, if you want to try it yourself.  Good images can be found by doing a google search for coloring pages.  Just remember, simple is better.
NOTE- the colors are not as bright as the original, as you can see here. Also, directional images will be reversed.
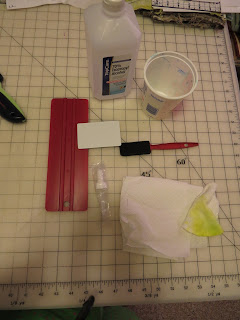


You will need:
8 1/2" x 11" white card stock
Assorted Sharpie markers
11" x 14" piece of clean muslin
10" x 12" piece of white cotton
scotch tape
rubbing alcohol
dropper or sponge paintbrush
credit card or flat rubbing tool
iron
I also keep a paper towel, scrap fabric nearby to blot excess alcohol


Step 1:  Color your selected image well.  Go over it a couple of times to really saturate the paper with ink. (Make sure to protect your work surface with a piece of scrap paper)
 The lower half of this picture is the reverse, so you can see the ink has soaked through in spots. 


Step 2: Lay the 11" x 14" muslin piece on your work surface.  Lay the 10 ' x 12" piece of white cotton on top of it.  (Both fabrics should be crease free)
Place your colored image face down on top of the  white cotton.  Tape in place to prevent shifting.


Step 3: Use the dropper or brush ( I prefer the brush) to spread the alcohol over the surface of the paper.  You need  enough to soak through, but not a puddle.

Step 4: Use your credit card or rubbing tool to push the ink into the fabric.  Press firmly and make sure you go over the entire image.  I go over it once vertically and once horizontally.

If the alcohol starts to make a puddle, use the paper towel to soak it up.  Try not to let it go over the edge of the paper!

Step 5: Lift one or more corners of the paper to see if the image had transferred successfully.

(You can see here some of the alcohol escaped and there is ink past the image)

If it has not, add a bit more alcohol and rub the back again.

Step  6: Once the transferred image is dry, press with a hot dry iron to set the image.  Remember to put your muslin under the image when you iron it to protect your ironing board.


This process is limited to size by the size of the card stock.  As you can see, I tiled the image to make it larger.
You may also notice that some colors transfer better than others.  Red always looks pink


So, what to we do with these transfers??  Here are a couple of finished projects I have made using the images I transferred.


Then Mary Lee found this site, showing how to design your own fabric. I used this technique to create a t-shirt.


I had better results using a dropper than a paintbrush, as you can see in this picture.  The design on the right was done with the dropper.   Also, some of the greens don't seem to spread as nicely as the others.


And similar to that technique is this one, using cups and rubber bands.
lines and dots- don't worry if the ink bleeds a little

After dropping alcohol

After drying and pressing

Add more designs for a really funky fabric!


So I've been a bit like a mad scientist in the lab, playing with these.  (Here's my lab)

No matter which one you try, it's fun and will give you some unique fabric to use in your projects.


 A word about colorfastness- all I have read says that once you heat set it, it is permanent and will not bleed.  However, please use caution when laundering these items!!  I do know that after repeated washing, it will probably fade. 

Monday, November 16, 2015

Making Kaleidosopes

I have never written about the time I spent with Paula Nadelstern last month when she visited the Museum Quilt Guild.  I was thrilled, after all these years of admiring her work- and missing other chances, to be able to take two classes with her!  She is very sweet and funny, and an excellent teacher! 


On the first day, we learned the magic of "Simple Symmetry"

You take a piece of fabric like this.


Cut squares like this


 And end up with blocks like this!


 Of course, eventually you end up with fabric like this.  :-)

 These are the blocks I made in class- you get three of each following the pattern Paula gave us.

And these are the second set I made.  I am still working on laying them out to use  as many as I can.


On day two we learned how to make the "Sixty-Thirty" block.  Easier than it looks, once you get the template making down!


I had brought along some of my collection of Jane Sassaman fabrics, so my block was a bit different from the rest, who were using Paula's .


I  cut out a second block the evening after class.  I hope to have enough fabric to make a bunch of them.


So, what to do wityh the little scraps you end up with?
Mary Lee showed the ArtCGirlz a ball she made using the template she found here.

I had the reduce the size of the pattern to make it the right size for my scraps.
( Sorry- the auto-rotate thing rotates pictures even when you rotate them and save them in a new file name and format!!!)


This is about 3 inches across. Maybe the right size for a very small boy to play with?  

 Here is something I hadn't thought of until recently: the effect of climate change on our pets.  My cat goes outside for short periods of time.  I know there are some who think it's terrible, but I count on her to help me with chipmunk control in the gardens around the house.  Until recently.  Twice within a week, she came in with ticks!  I was able to remove them, and have seen no sign of illness, fortunately.  But for now, she is not allowed outside, until there is a sustained cold to kill the ticks, at least.  It has been warm here for November.  I know one year isn't proof ( last year at this time, Buffalo got 5 feet of snow, remember?)  But I will be asking my vet about treating her for ticks before next summer!

I am grateful for:
The second round of my cold was much shorter than the first.
I found the boots I had been searching for.
Meditation
Some good sewing time this weekend
I get to go spend the afternoon with Jonathan!