Thursday, February 14, 2013

Art C Girlz Ice dye challenge revealed!

 Back in October, Mary Lee gave each of us a piece of her fabulous ice dyed fabric- about a fat quarter- to play with.  She just wanted to see what we would all be inspired to do with it.


Something in the colors reminded me of this picture I took at badlands National Park in 2010.   I had printed this picture to use in one of the exercises in Jean Wells" book Intuitive Color and Design. This gave me the opportunity to do that exercise.  (which by the way was on the "just for me" list!)
 Using the colors in what I felt was the correct proportions, I created this strip set.  I had thought to do a bargello style piece.  But there just wasn't enough of it to make it interesting.
Now what?


I discovered that flipping some of the pieces made a HUGE difference!  Much better! 
With the quilting lines, I tried to add the visual texture you see in the badlands.


In Jean's book, she shows a finishing technique she calls a portrait finish; where you mount one small quilt onto a second one, like a picture frame. 
 So I created this second quilt to try that technique- adding small inserts from the dyed fabric for continuity. I had been wanting to practice close together quilting for a while, too!

This is the finished piece, which I am greatly pleased with!

So I am very grateful to Mary for challenging us and to Jean Wells for continuing to inspire quilters!


You can see what some of the other "ArtC Girlz" did here!

Monday, February 11, 2013

Zentangle a day

Following up on last week's post in a way.
When I first started doing zentangle, I did it every day.  I was learning, improving my repertoire of patterns, enhancing my skill.  Plus it is just a relaxing and meditative thing to do.  I don't always make time to meditate as I should, but I will sit down with a pen and create a small piece of art.  But as time went on things changed and I stopped doing it as often.  When I did pick up a tile and a pen, I was often dissatisfied with the results.  I was out of practice.  One of the blogs I read mentioned a book called One Zentangle a Day, by  Beckah Krahula. I looked at it several times at Amazon, but it was near the holidays and so I talked myself out of it.
A couple of weeks ago, I decided I was worth it after all.  I'm lucky to have found Karen's Yarn, Paper Scissors in Batavia a while back.  Small shop with lots to offer, actually- if you haven't stopped in yet.Anyway, she has zentangle supplies!  So I didn't even have to wait for the package to arrive.  :-)

Even though I am somewhat experienced, I am doing every exercise in the book as if I was brand new to the art.  This is a page from my sketch book, where each day there are new patterns (tangles) to learn, and sometimes an enhancement as well. Some of the "tangles" don't appeal to me, but learning them may benefit me later on. 


 After practicing, you create a "tile"- what they call the small squares we use for the art.
Sadly, the scanned images don't show the shading very well. 
 Here are my daily tiles for the past few days.  Not all masterpieces, but that isn't the point, is it? 
Day 2
Day 3
Day 5
Day 6
 In all forms of creativity,at least part of the enjoyment should be the process.
 It has taken me a long time to learn that!

Is your home sealed up from the winter winds?  Something as simple as outlet covers could cut your heat loss and reduce the amount of energy required to heat your home!  Every little bit helps!


  I am grateful for:
The beauty of the sun shining on a fresh layer of snow, making the world sparkle.
The luxury of time to spend on my creative pursuits.
Chicken enchiladas
A conversation with my son.
The people who adopt my foster babies and give them good homes!

Wednesday, February 6, 2013

Just for me!

I have decided this year I am not playing.  Not joining swaps, or round robins, or other group projects.  Picture a spoiled six year old pouting and stamping her foot!  Somewhere there exists a picture of me in that pose, but I couldn't find it.  I admit it, I was that child. I bet all who have spent time with me are shocked.

Anyway, the reason I'm holding my breath and saying no is that for years I have been putting projects I want to do just for the fun of it on the back burner.  You know how it goes- I'll do that one as soon as I get the calendar quilt made, or as soon as I finish the challenge, or that quilt for so-and-so's birthday.  So this year I am going to get them out and do them.  Just for me.  Selfish quilter year.  Think I'll actually do it?

I got a small start on it Monday.  I got out Pat Ferguson's "Zen Quilting Workbook", which  I bought over a year ago, and made this little quilt! 
For those who don't know, zentangle is an art form created by graphic artists Maria Thomas and Rick Roberts.  I started doing it about 5 years ago.  I have always doodled, but this is a little more than that.  And I believe practicing the repetitive patterns involved in doing it has improved my free motion quilting!  I was not surprised to see people making quilts using this technique! 

This is the original "tile" I used for the quilt.  (sorry I didn't rotate it to be in the same orientation)
Some of the lines and darker areas are colored in with the same pigma pen used to create the original. 
I don't know what I will do with them, but I will do more of this- maybe on some of the beautiful hand dyed and painted fabrics I just can't bear to cut into. 


The "green" tip this week involves sharing.  Do you read a lot of magazines?  Get sucked into buying it at the grocery store when you picked it up to pass time in line? Tear out a recipe pr two and the rest goes into the recycle bin ( I hope).  Before you toss that magazine, why not share it?  My local library has a collection box for sharing them, as does the college where I work.  Give them to your child's (or grandchild's) teacher for use in art projects or other classroom assignments.  Take them to a senior center or assisted living facility.   Get the most out of them before they get recycled!

I am grateful for:
Eating real food again
An exciting Superbowl game
Knowing when to ask for help
How much my boss appreciates the very little things I do
Settling on a plan

Tuesday, January 29, 2013

Finding inspiration

I didn't have much to say this week, so I put off posting, thinking I'd have something interesting.  Not going to happen, I fear. At least not today.


Here are the most recent projects I've finished.  I made a new "banner"(left) for the Museum Quilt Guild to use when we hang our annual challenge display, among other events.  The old one -above right- has been used longer than anyone can remember.  It was made back when there wasn't a lot of quilting fabric to choose from.  So I made something a bit more modern.The bits I found from last year's raffle quilt really gave this one its pizzazz!


Last week I finished this shawl I was knitting.  The pattern is called Wingspan.  It's a free download at ravelry.  I used Noro silk garden sock yarn.
Isn't George pretty, too?


So, since I didn't have much to share, I decided to ponder finding inspiration. In the books I read by renowned art quilters, they all say to keep a sketch book.  I've done a bit of that when I have traveled, or when I remember to make time for it.  But I don't do it regularly.   I do leaf through magazines and collect pictures with colors or patterns that make me stop and say oooh!


Isn't this one fun?  Look at those colors!  And the lines behind the shoe are a great visual texture.

 I couldn't scan this whole picture, but the combination of color, line and those circles will find their way into something I create at some point.


This picture is some "goblet" cells. My friend Diana found a pinterest page with all kinds of this type of photo.  Naturally the colors drew me, but the aren't those fun shapes and textures?
 Or pictures I take myself.

This is red leaf lettuce.


The Yellow Mounds in Badlands National Park, South Dakota.


Inspiration is where you find it.  In a class I took with Jane Sassaman, she had a "Visual Bibliography" on the supply list.  So when you feel you're in a slump, get out a book of flowers, some old magazines, go through your old photos and feed your muse!

What do you suppose the smog in China has to do with us here in the US?  Quite a lot when you consider a few things.  First- many of our products are produced cheaply in China due in large part to the laxity of their environmental laws.  For example, the runoff from textile dyeing goes directly into fresh water streams over there!  We have all seen examples of this in the many recalls of products with lead paint in recent years.
Second, where do you think that pollution is heading? It's not like we can close the window to keep it out of our air!  We all need to consider these things when we vote with our dollars.

I am grateful for:
Sleeping through the night.
When a small change makes a so-so project fabulous!
Three of my last four foster babies have forever homes!
Being appreciated for the little things.
Meeting all my deadlines (for now)

Monday, January 21, 2013

Now I can show you!!!

Let the Wild Rumpus Start!


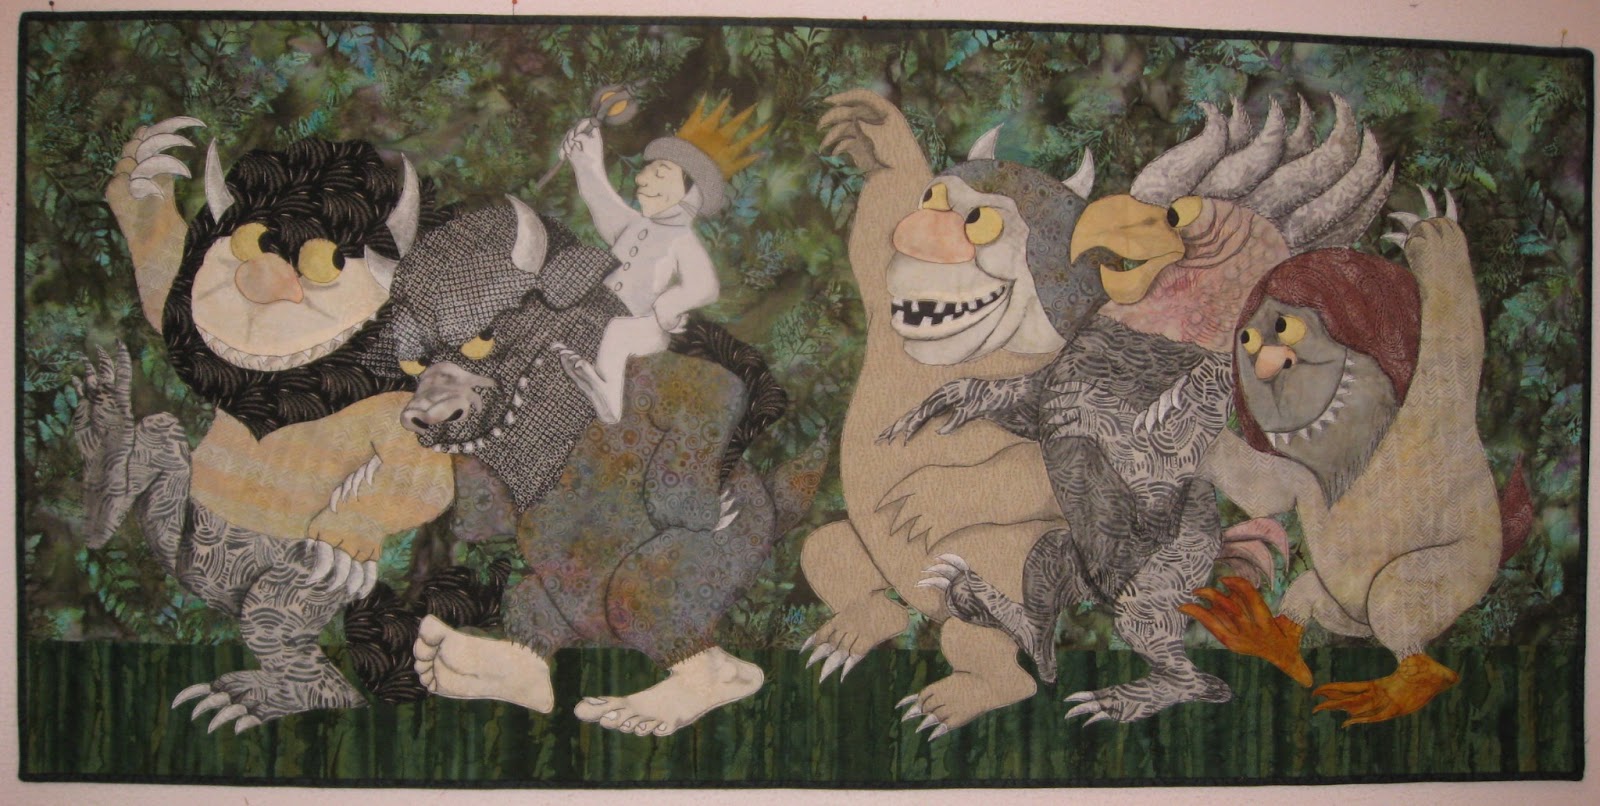
Saturday was the annual reveal of "Challenge" quilts at the Museum Quilt Guild.  It's always a great meeting since we see such amazing creativity on display!!   This year's theme was "Literature". The picture above is my entry, based of course on Where the Wild Things Are, by the most beloved Maurice Sendak. Here is the page from the book.

This is the quilt I was working on when I did the coloring and painting on the fabrics to alter them, but I bet you could have guessed that.  Anywhere you see shading and detail, it was added with a combination of pigma pens, Tsukineko ink, watercolor crayons and wax pastels.                  


The stripes on the first "thing's" upper body were painted on with wax pastels.


The  middle "thing's" head was one of the parts I was most pleased with the result! 


 This quilt will be a gift to my son Lucas.  We must have read this book a thousand times one year.  He would ask for it several times a day and repeatedly at bedtime!  I may buy him a new copy of the book to go with it, since our copy was a gift to my brother when the book was new in 1963!  It's well loved, as a good children's book should be, I guess.


Fearing I would not finish the Wild Things quilt in time, I had also had the idea of a child reading a book when the challenge was first announced.  One of my own favorite books as a little girl was    Harold and the Purple Crayon, by Crockett Johnson.  I scanned the book- my very own copy of A Picture for Harold's Room, which cost 50cents when I got it!  Happily I found that skewing it was an easy operation in programs I already had.  The rest of the quilt was made to fit the book once it was printed.


I decided to add a few of the lovely drawings from other Harold books in the background, using  a thread sketching technique.
Harold and his crayon had marvelous adventures!  It's a wonderful lesson for children that the world is what they choose to make of it.  I titled the piece, Create the World You Want.


My "green" tip this time is back to making small changes.  Do you use paper towels and paper napkins?  Ever thought about how much money you throw away?  Most household cleaning can be done with a cloth towel or washcloth which can be washed and used again!  In my house a roll of paper towels easily lasts three months since we only use them for the kind of messes you don't want to toss in your washing machine. (bacon grease, car maintenance, etc)  Cloth napkins are in expensive- often available at thrift stores and garage sales or flea markets!  They can be made from faded or stained tablecloths as well- repurposing something you might otherwise throw away!  They last for years and once you're done with them at the table they can still be used as polishing rags, dust cloths, or even a hankie (they get softer as they age!)  If you must use paper, look for brands made from 100 % recycled paper!

I am grateful for:
Internet radio
Unscheduled days
The good times
Fringe- it's over now, but it was a great show!
Not the same old teams playing the Superbowl this year- should be a good one!

Monday, January 14, 2013

Anita's "Old Italian" block

 I'm fostering babies again after a holiday hiatus.  These four have had a pretty rough time of it, but are so sweet!  Their fur is thick and soft and they love to be cuddled.  They are doing much better now and hopefully will find forever homes soon after they go back to  the shelter!


A while back a few of my ArtCGirlz friends asked me to show them the way I do Anita Grossman Soloman's "Old Italian" block from her book Rotary Cutting Revolution.  This method is mentioned in the book, even though she does not teach it this way.  I asked her about it when she was here in October of 2011.  She prefers to choose which fabrics are paired and this method gives fixed sets of blocks.   So she doesn't recommend this way, but did acknowledge the piecing is quicker!

So, to get started, assemble your scraps.  Cut from scraps, two 8-1/2 inch squares.
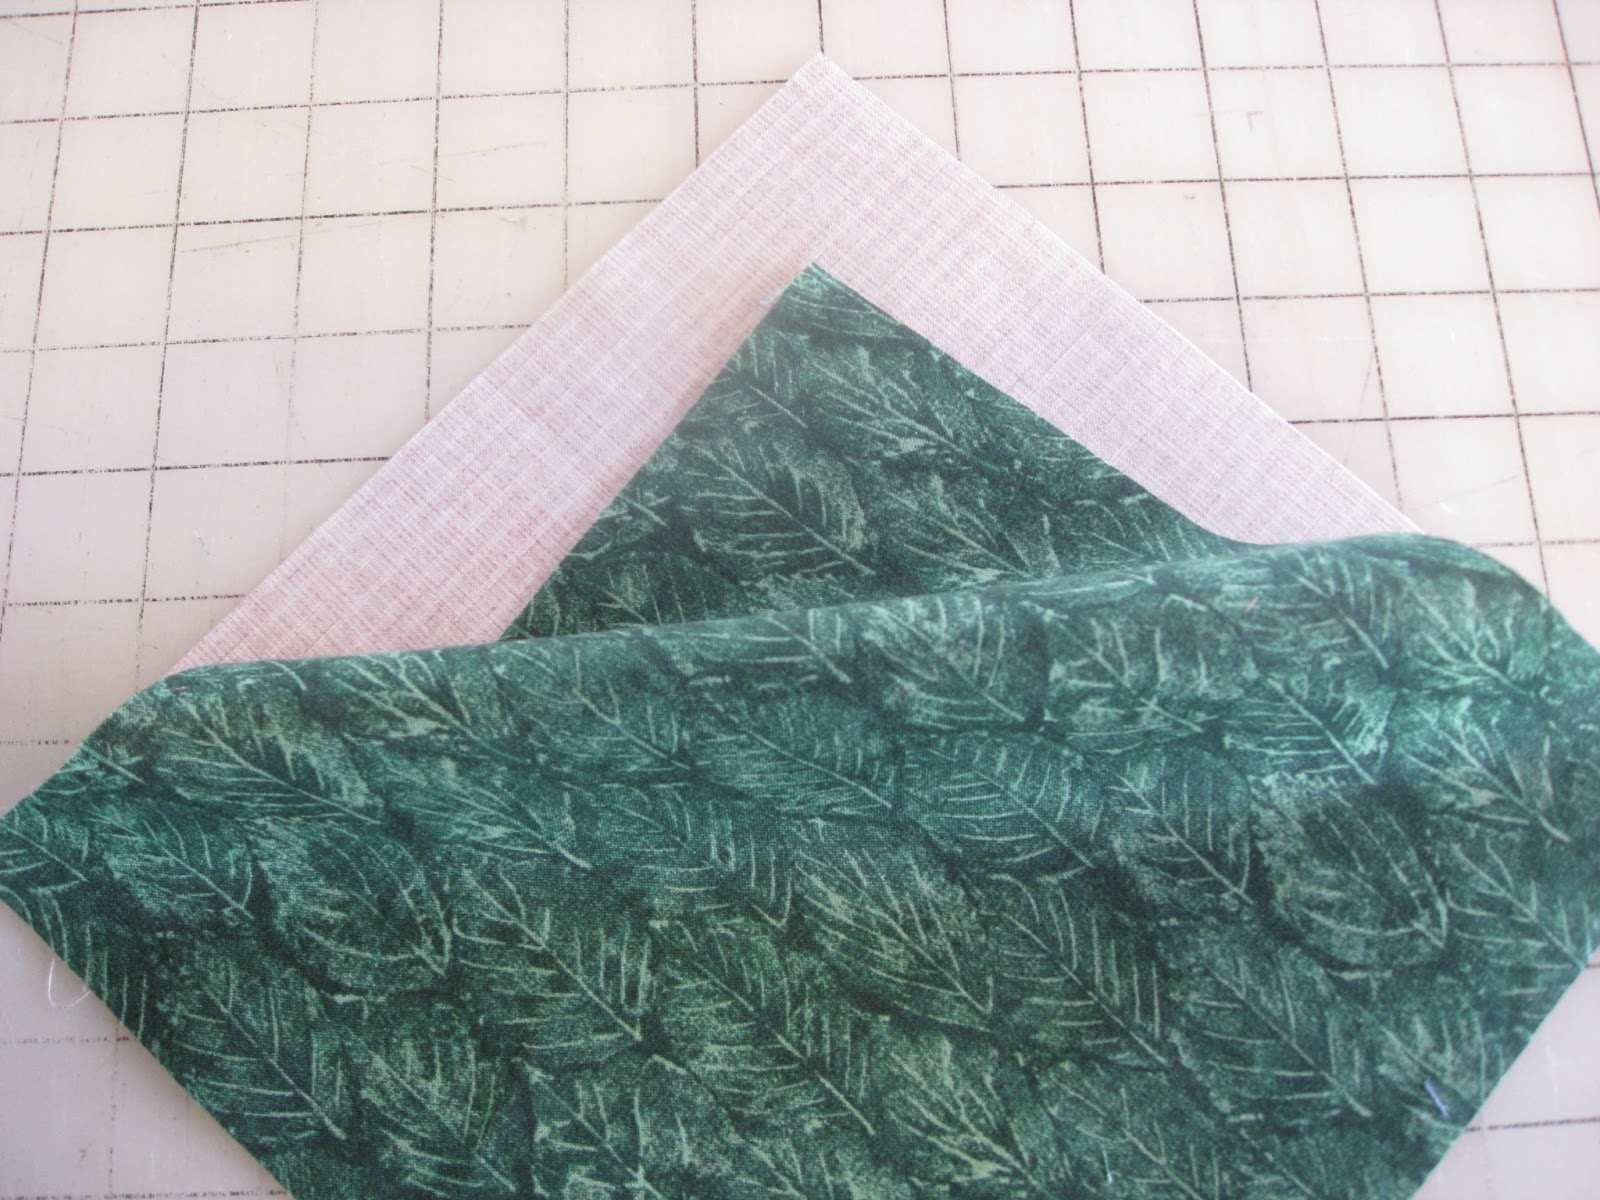
 Lay both fabrics RIGHT SIDES UP on your cutting mat.
Center the top and bottom corners with a line on the mat  as shown.  
( note to self: learn how to add words and arrows to pictures as I have seen in other blogs)
 Using the center line as a reference and cutting a scant on inch from either side of the line, cut a scant 2 inch section in the center of the block.


Switch the center bottom layer to the top.  Take your pieces to the sewing machine. 

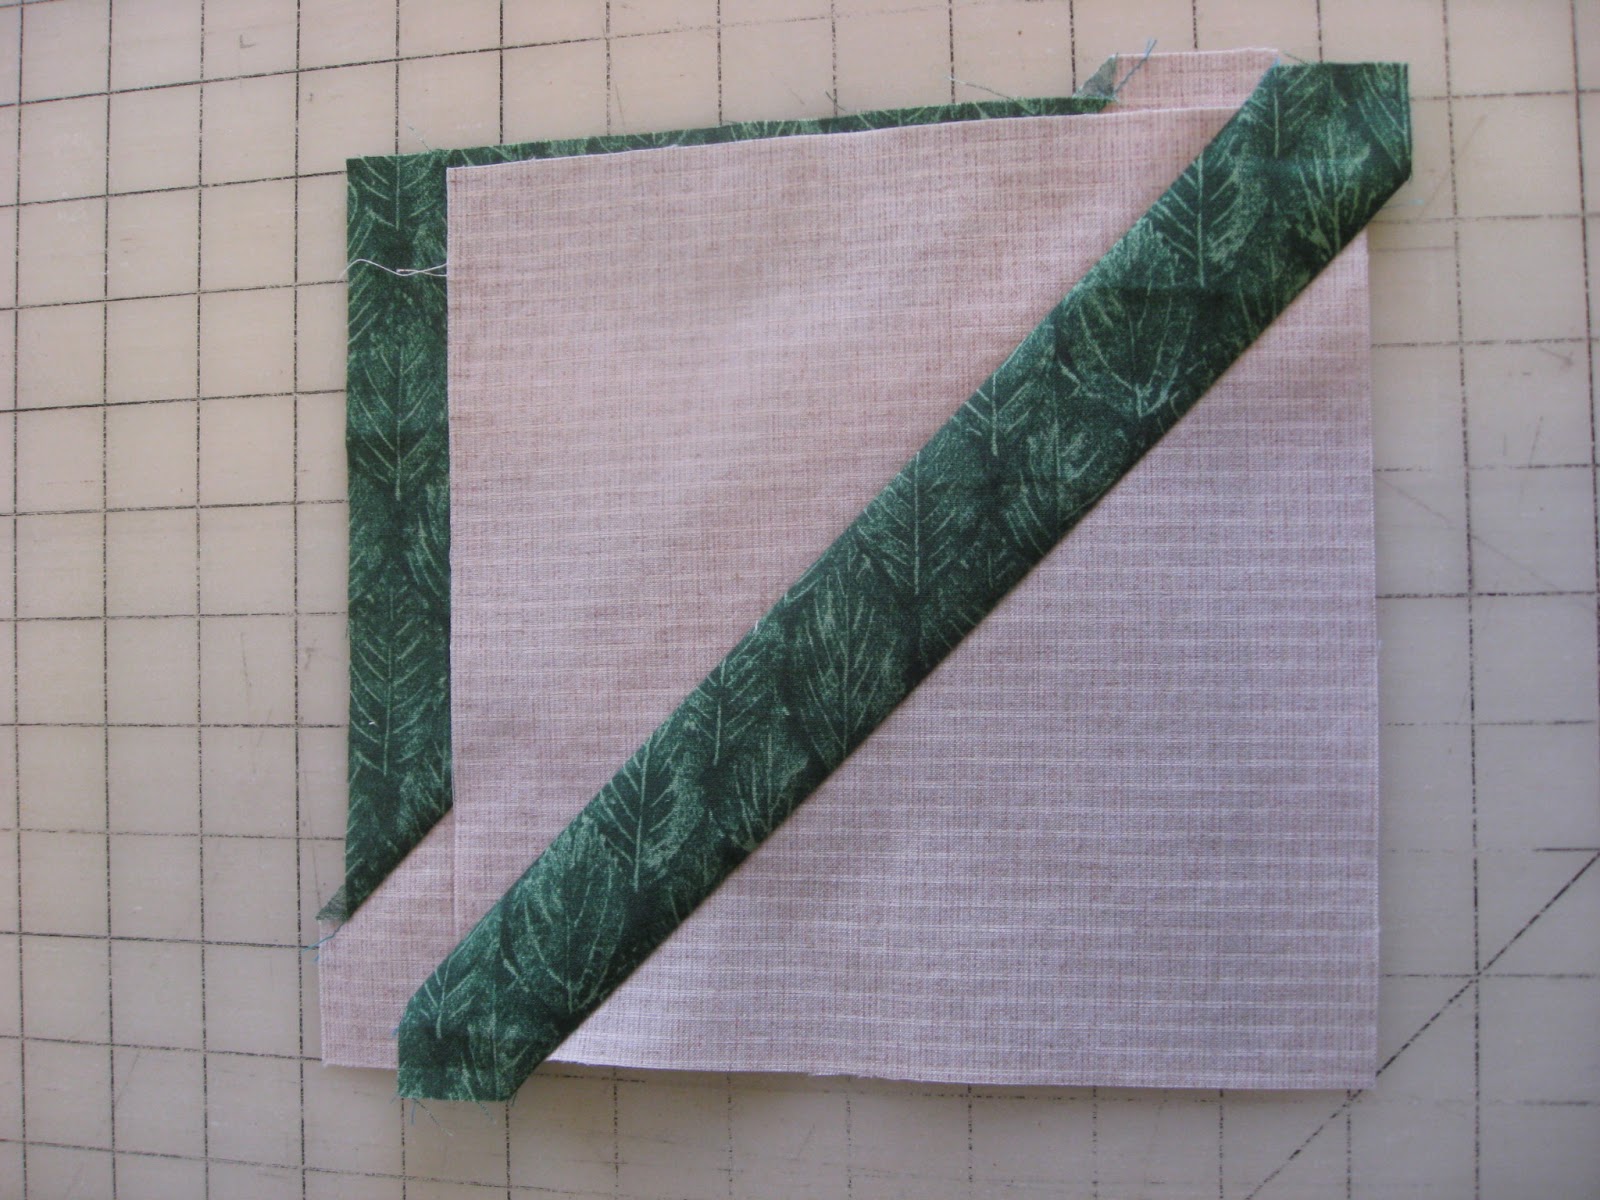
 Lay the triangle right sides together with the center.  BE VERY CAREFUL sewing bias edges!!!!  Also note that the ends of the triangles do not extend past the ends of the center piece as would happen if pieces were cut with templates.
 When you have sewn both triangles to the center section, press CAREFULLY toward the darker fabric.  Do not use steam as this may distort the bias edges. See how the center section is longer than the triangles?  That's supposed to happen.
 Lay the blocks on the cutting mat RIGHT SIDES UP as before.
 Line up the opposite corners with the vertical line on the mat this time
 Cut a scant 2 inch section from the center as before.
 Swap the bottom layer to the top- and there is the block you will get!
 With right sides together, make sure the first set of seams match.  Pin if you feel the need.  The seams will nest in together, so just hold them as you sew so there is no shifting.
Press carefully to the darker fabric as before.  I use a little starch at this point to get the seams to lay flat.

Center a 6-1/2 inch ruler over the block  as shown.  If you have Anita's book an easy way to get this perfect is to trace the lines from the block pattern provided right onto the ruler.  I'm happy just eyeballing the center with the diagonal lines of the ruler.  
 Trim the blocks to 6 - 1/2 inches.
 
 
Aren't they pretty?
 Let me know if there are still questions for this technique.  I'm here to help!

In "green" news-
My grandmother had a sort of door on the stairs to the second floor of her house,  She lived alone, had a downstairs bedroom and 1/2 bathroom, so didn't use the second floor of her house much at all.  She would open the door when company came.  I do the same thing in my house and am constantly amazed at how much cooler the second floor of the house is.  As we all learn in school, hot air rises.  It is silly to allow that nice warm air to escape from the living areas of the house to the rooms we use less often.  I close off doors in the upstairs rooms as well.  My sewing space is one of the coldest rooms in the house in winter.  But I'm only in there a couple of days a week most weeks. (except right before a deadline!)  And once I get the lights and the iron on it gets pretty hot in there!
Just one of the things I started doing because I'm cheap, which also helps the planet since I am using fewer resources and creating less CO2 in the process.
In my research I found several sites that said closing registers to save is a myth.  So I'll share that, too. Maybe my way is better.  My Gram was a very wise woman! :-)

I am grateful for:
A couple of warm days in winter to remind us why we put up with the cold.  (Would spring be as sweet without suffering through winter?)
Really good games in the Playoffs this year!
I'm almost finished, so no late night before the deadline!
The panic before the beginning of the new semester is over.
Homemade ham and split pea soup.


Monday, January 7, 2013

The world is what you make of it, friend. If it doesn't fit, you make alterations.

George has suddenly discovered "up"


The quote above is from my favorite Western movie, "Silverado".  The character is played by Linda Hunt- way before CSI made her a household name.  It sort of fits the theme of this week's post.


I'm working on a project I still can't show.  Partly because it isn't finished (in fact I should be sitting at the machine instead of the computer right now!).  Also because it's for the challenge at Guild, which we present on January 19th.  It turned out to be a pretty ambitious project for me not to have started until  Christmas!  I can tell you there is fusible applique involved.  One of the first steps after enlarging my picture was to number the pieces.   That is when you come to terms with the amount of work involved in what you want to do.  After doing this, I have a whole new admiration for quilt artist Kathy Nida, who in a recent blog post mentioned having the fabrics selected for the 700's in her current project!!
The before fabric


Due to the time constraints I was working with, I decided to simplify where I could- combining pieces and reducing the amount of pieces if I thought I could achieve the same look another way.  What exact way was a question to be answered another day!  So I spent loads of time going through nearly every bin of fabric I own to find the right pieces for the numbered sections of the picture.

After, now with stripes!

 One of the first challenges was a striped area.  That was when I had my "AHA moment"!!  In my small art group, we have been sharing and trying new techniques for going on three years.  One of the first was watercolor crayons and oil pastels on fabric.  Easy Peasy, and perfect as it turns out!

The before picture should have been rotated so the little pattern was the same.  Sorry.


Then there was the area where the whole thing was six different pieces of the same fabric.


Nope- just use pigma brush tip markers and the watercolor crayons to define the shapes!


And then there's tiny details, like buttons.  They were the same color as the shirt anyway!  So ta-da!  pigma pens to the rescue!

By the way, if you want to improve your drawing skills, copying an existing picture is a great way to do it!  I think I have learned a lot about shading and definition from this project!  You may think you can't- but so did I.  Turns out, I could!


I am still making my daily comment on the 30 days of fracking regs page.  If you care at all about clean air and water and the furute of the planet- just take a minute to inform yourself.  Yesterday I learned through my readings about the group "Unshackle NY".  At first glance, they sound like all they want is to create good jobs for everyone.  But in reality it is really just a group of (probably very rich already) businessmen who only want an end to any regulation that limits their ability to take any shortcut or make any decision they want to make a lot of money with the least amount of effort on their part.  They are no friend to the environment at all!!!

I am grateful for:
The lull after the holidays.
Soup weather! (looking forward to split pea later this week!)
My boss, who gives guidance and suggestions rather than orders!
Baby steps forward.
The cookies are gone so I might stop getting fatter now.