 I'm fostering babies again after a holiday hiatus. These four have had a pretty rough time of it, but are so sweet! Their fur is thick and soft and they love to be cuddled. They are doing much better now and hopefully will find forever homes soon after they go back to the shelter!
A while back a few of my ArtCGirlz friends asked me to show them the way I do Anita Grossman Soloman's "Old Italian" block from her book Rotary Cutting Revolution. This method is mentioned in the book, even though she does not teach it this way. I asked her about it when she was here in October of 2011. She prefers to choose which fabrics are paired and this method gives fixed sets of blocks. So she doesn't recommend this way, but did acknowledge the piecing is quicker!
So, to get started, assemble your scraps. Cut from scraps, two 8-1/2 inch squares.
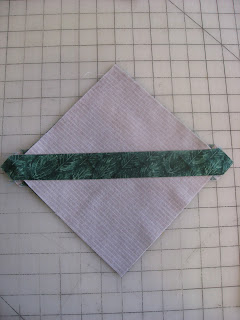
Lay both fabrics RIGHT SIDES UP on your cutting mat.
Center the top and bottom corners with a line on the mat as shown.
( note to self: learn how to add words and arrows to pictures as I have seen in other blogs)
Using the center line as a reference and cutting a scant on inch from either side of the line, cut a scant 2 inch section in the center of the block.

Switch the center bottom layer to the top. Take your pieces to the sewing machine.
Lay the triangle right sides together with the center. BE VERY CAREFUL sewing bias edges!!!! Also note that the ends of the triangles do not extend past the ends of the center piece as would happen if pieces were cut with templates.
When you have sewn both triangles to the center section, press CAREFULLY toward the darker fabric. Do not use steam as this may distort the bias edges. See how the center section is longer than the triangles? That's supposed to happen.
Lay the blocks on the cutting mat RIGHT SIDES UP as before.
Line up the opposite corners with the vertical line on the mat this time
Cut a scant 2 inch section from the center as before.
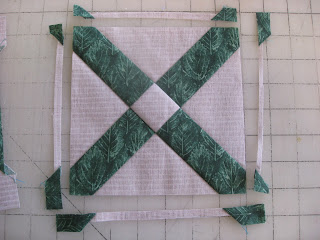
Swap the bottom layer to the top- and there is the block you will get!
With right sides together, make sure the first set of seams match. Pin if you feel the need. The seams will nest in together, so just hold them as you sew so there is no shifting.
Press carefully to the darker fabric as before. I use a little starch at this point to get the seams to lay flat.
Center a 6-1/2 inch ruler over the block as shown. If you have Anita's book an easy way to get this perfect is to trace the lines from the block pattern provided right onto the ruler. I'm happy just eyeballing the center with the diagonal lines of the ruler.
Trim the blocks to 6 - 1/2 inches.
Aren't they pretty?

In "green" news-
My grandmother had a sort of door on the stairs to the second floor of her house, She lived alone, had a downstairs bedroom and 1/2 bathroom, so didn't use the second floor of her house much at all. She would open the door when company came. I do the same thing in my house and am constantly amazed at how much cooler the second floor of the house is. As we all learn in school, hot air rises. It is silly to allow that nice warm air to escape from the living areas of the house to the rooms we use less often. I close off doors in the upstairs rooms as well. My sewing space is one of the coldest rooms in the house in winter. But I'm only in there a couple of days a week most weeks. (except right before a deadline!) And once I get the lights and the iron on it gets pretty hot in there!
Just one of the things I started doing because I'm cheap, which also helps the planet since I am using fewer resources and creating less CO2 in the process.
In my research I found several sites that said closing registers to save is a myth. So I'll share that, too. Maybe my way is better. My Gram was a very wise woman! :-)
I am grateful for:
A couple of warm days in winter to remind us why we put up with the cold. (Would spring be as sweet without suffering through winter?)
Really good games in the Playoffs this year!
I'm almost finished, so no late night before the deadline!
The panic before the beginning of the new semester is over.
Homemade ham and split pea soup.


No comments:
Post a Comment
Note: Only a member of this blog may post a comment.